So here is something I have been wanting to try for a while.
This craft is so easy and there is no end to the cool things you can do!
I already have about 10 ideas for more books in my mind!

For my first two attempts, I decided to go with replicas from movies I like.
This a simple and easy replica from the Evil Dead 2.
I just took an old hard cover book.
This one is just some mediocre cookbook.

I drew on the face, just sort of eyeballed it not trying to be exact.

I built up his features and some big wrinkles with paper mache paste and paper towels.
Then I covered it with a skin of paper mache napkins and paper towels.

I let it dry to the touch opened like this for just a little bit.
Then I bound it shut with twine until it was completely dry, for about 2 days.
Unfortunately I didn't take a picture but this step but it is a very important.
If you don't the book cover can warp out too much.

Yes, that is an ear on the other side.

After he was dry I began the painting. I used raw umber for the base color, red for the mouth parts.

I did a black wash and then dry brushed on gray.
I highlighted the teeth and the one eye with a dry brush of yellow ochre.
The next is a little more complicated and I got a little carried away.
I started with a large cardboard book box I got on clearance at Micahel's

I know it's pretty, and I am about to destroy it!
I was actually a little sad because despite my dark inclinations, I do like butterflies.
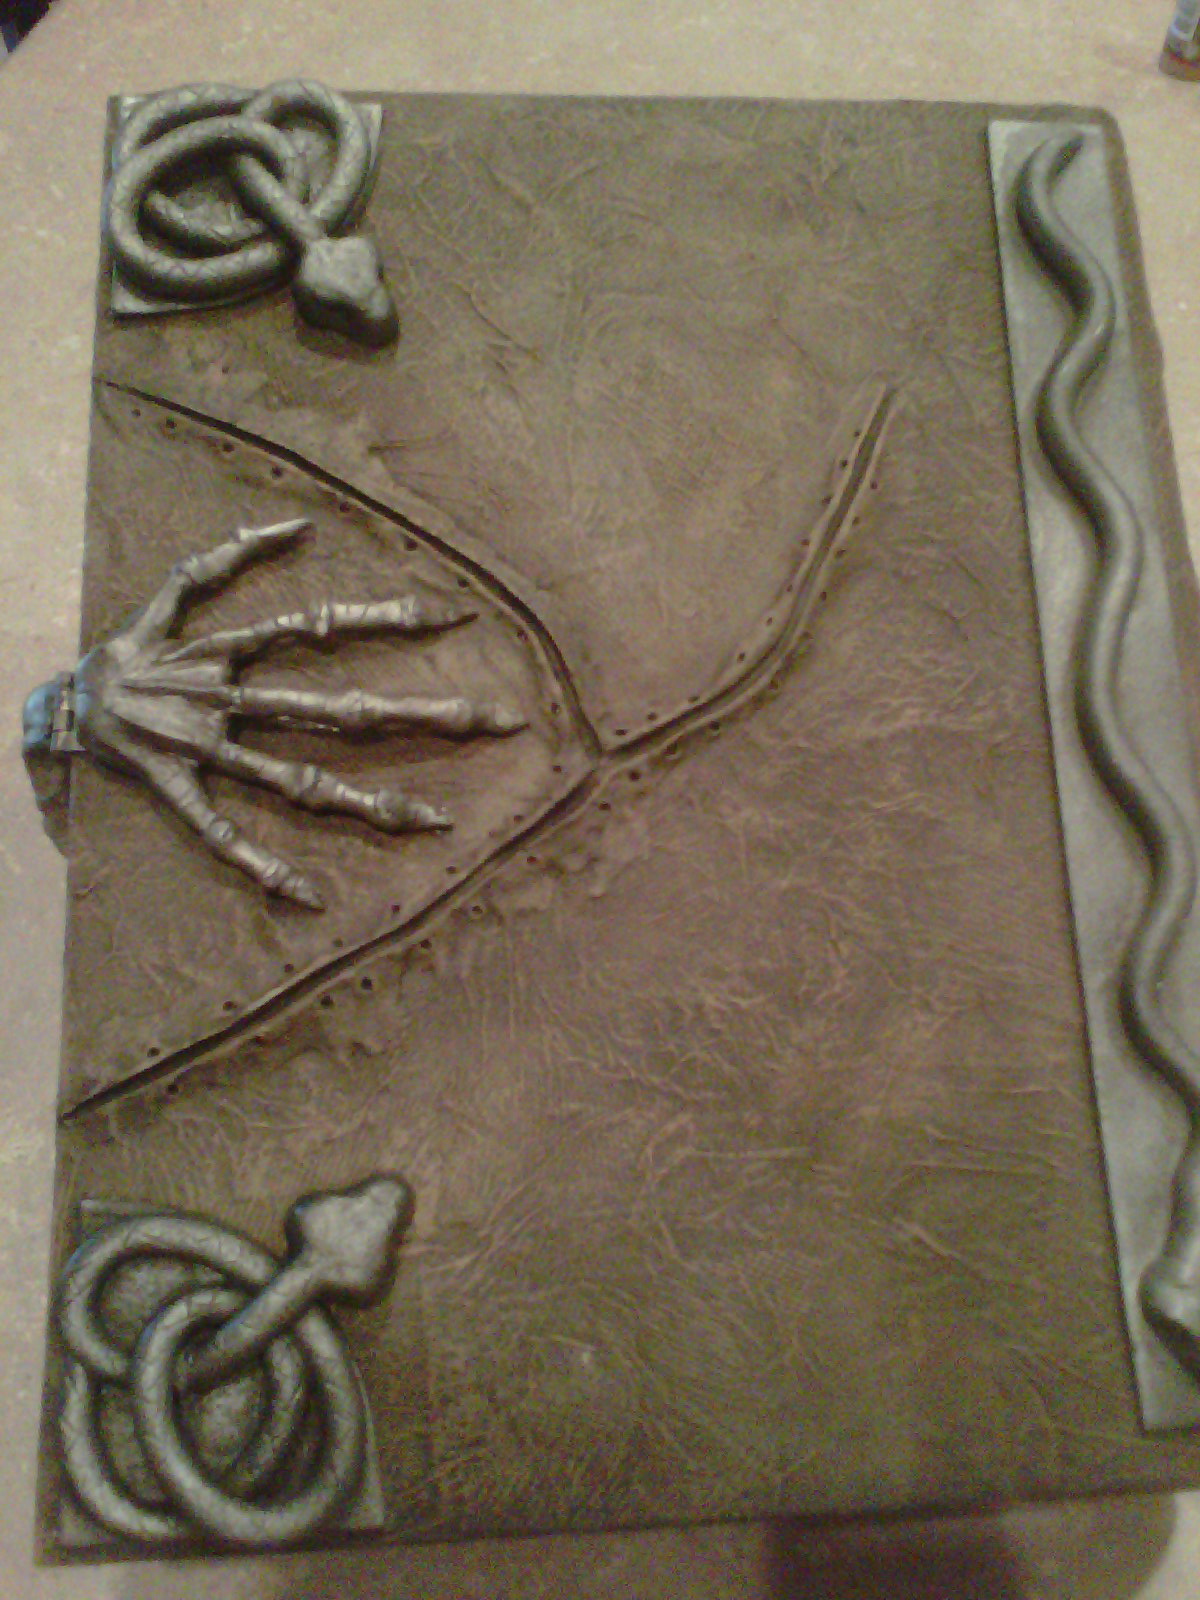
So here I am making the spell book from the movie "Hocus Pocus"
This time I started by covering the book in a skin of tissue paper using mod podge.
It dries really quickly.
Next using clay I made the seems where the skin is sewn together.
I used Das red cause that's what I have on hand.
Paper clay would be good too, or any air dry clay that doesn't shrink.

Using the same tool I poked holes for the stitching.

Here is another hint, add a small layer of the tissue paper over where the clay meets the book.
I did it on the front but forgot on the back. If you look at my finished photos,
you can see the seams in the back, but the front is blended.
Next I made a little eyeball out of Fimo.
It wasn't a full sphere. I just a rounded a half circle of a little lump of clay baked it.
Then hand painted the iris, and added a gloss sealer to make it look wet.

I added the lids using Creative Paper Clay this time.
Oh I forgot to mention after the book and clay was dry I painted it with a mix of raw umber, and raw sienna. then I did a black wash, and dry brushed on more raw sienna.
Next I glued my eyeball on the box.


Then I used more paper clay and blended my eyeball into the rest of the cover.
And of course painted it to match.

Next I started work on all the metal embellishments.
Using fimo I sculpted one of the snakes and baked him.

Then I made a base.

I pressed my mostly cooked snake on top and baked it again until it was done.

There are four of these babies on the book, so instead of sculpting all of them.
I decided top make a mold, and do copies.

I used silicone for the mold and two part resin for the copies.
All available at most craft stores. Good time for 40% off coupons.
the mold kit is about $20 and the resin was like $15. I used about half each kit for this.

Sturdy resin copies in no time!

I painted them with black spray paint and a light spray of silver over top.
Next I made the clasp that goes around the eye.
In the fimo again, I made a ring that fit around my eye and baked it.

I wanted it to be a functioning clasp so I used these tiny hinges from Lowe's.

I made a brade of fimo

I smushed it in and attached it to my hinge.
Also (not pictures) I stuck a piece of coat hanger
through the entire thing to make it strong, and then baked it.

I attached them with gorilla glue and then covered it in fimo to make it all one piece.

For the little hand on the back I used coat hanger pieces and just sculpted over it with fimo.


All these pieces when done received the same coat of black and silver paint.
There was is also a long snake on the spine of the book.
I forgot to take picture as I was sculpting , but he is also fimo.
After all the silver pieces are glued on I did a wash of watered down raw umber,
to make them look aged and tarnished.

I still need to add the threads, and there is some detail on the spine, and a couple jewels.
But that is all easy and I need a break form this book for a little while.

The back
the side

opening it

I may need to do something about the inside though.....

Edit: And we have stitches....

I used 13.7m hemp cording I had on hand
(you can find it in the jewelry section at craft stores ).
I simply cut and glued the stitches in.
I pushed it in the holes with an extra large sewing needle.